




Wednesday, November 14, 2012

Flashback: I was a Disney Cast member - Part 1

I worked for Walt Disney World in the summer of 1997. I never really planned on working there. It just happened! Here's my part 1 of my story.

My friend heard that Disney was casting for the season as well as year-round employees cast members. They were hosting a day long job fair. I tagged along out of boredom really. I already had a summer job working at my college's Bio lab, assisting my professor with her botany project. I spent the days in the darkroom, developing pictures of this plant that tracked the sun. Anywoo, exciting stuff.

Back to Disney, we arrived at the job site (a large tented area) where Mickey Mouse greeted us, dressed in his safari outfit. Get it? Because people were "job hunting"! Oh, that Mickey. I saw that you could work just once a week and still get the park benefits (I'll cover those later). We completed applications and got called for on the spot interviews. They asked us what areas we were interested in as well as reviewed our previous experience. I indicated I wanted retail (it's what I had experience in). In retrospect, I could have been a character as I was the right height to place Minnie, Chip and Dale, etc.

I passed the first interview (so did my friend). Because I was interested in retail, I had to take a math test. The testing took place at the Casting office (visible from I-4). I passed that test and then waited. And waited. Then I got called back to a recruiter's office and got my offer! I was hired for weekends and was assigned to the Studios in retail. At that time, you were hired for a zone. My zone was near the Backlot tour. My retail spots included the American Film Institute store, souvenir nametag kiosk, Ellen's Bookstore (from Ellen's sitcom!), and a photography stand. You got assigned to whichever area needed you the most.

Before I could start at the Studios, I had to go through Orientation Orientation was called Disney Traditions. In 1997, Traditions was a two-day class. In researching for this post, it looks like Traditions is only 1 day now. Traditions was a crash course in all things Disney. We covered all the different parts of Disney (ESPN, Touchstone, etc etc). We were required to dress professionally--suits! You may have heard of the Disney Look Book. We received a pocket sized book that included hairstyle recommendations (!!!), jewelry requirements etc. Of course, all of this information is on their website now! My favorite part of Traditions was the scavenger hunt. In our business dress, we had to run around Fantasyland to find examples of attention to detail as well as hidden Mickeys. My group also visited the Polynesian Resort.

My class had all different cast members in it. Retail, Parking, Characters etc. There is definitely a pecking order. The hardest positions to fill are the "face" characters like all the Princesses, Prince Charming, etc. Costumed Character cast members usually played a couple of different characters. All characters had to also take an autograph class! You can definitely appreciate the need for Mickey's signature to look EXACTLY the same whether you are at EPCOT or the Magic Kingdom etc.

Before I forget, Disney benefits included free park admission at any time, quarterly free tickets to give to your friends and family, retail discounts, and Cast Member nights at Pleasure Island (RIP). I did not qualify for medical etc, so I cannot speak to those.

After Traditions, I had to attend a 2 day Retail class where we learned how to count back change "The Disney Way". Disney required that we count back change up to the original tendered amount. For example, your total is $17.25. You pay with a $20 bill. I would say, "Your change is 25, 50, 75. 18. 19. 20"  The change amount was NEVER displayed on the register. I'm sure we learned other things, but that's the big thing I remember. I also remember that we rode Tower of Terror before the park opened. You know, to help wake us up for class!

Next post: My first weekend...which happened to be during Pride weekend ;)


Latest Consignment Find: J Crew Reve Shirt

Consignment find

Consignment find by natylite78 featuring old navy

I bought this shirt a couple of weeks ago from one of my favorite consignment stores. I normally shy away from shirts with words on them, but I liked the sequins and thought it would be fun to mix in with my current wardrobe.

I wore it with the orange Old Navy Rock Star Jeans and TB's. It was a fun way to update the "Jeans and T-shirt" look.

I'm thinking of pairing it with a pair of skinny jeans and the green Talbots blazer that I picked up a month or so ago. 

I recently bought 2 work friendly pieces from eBay and can't wait to share if they worked out (or not!).

Monday, November 12, 2012

What I'm Loving: Baby Sniffles Edition


Jack had his first cold a month ago. Considering J and I both suffer from seasonal allergies, I figured Jack would be the same. The above products are in my mommy arsenal to fight the runny nose.

(1) Saline Drops - I use Target's generic brand of saline drops. They help keep the nasal cavity moist and loosen the hard mucus that may be get stuck up there.

(2) Boogie Wipes - Boogie Wipes are saline wipes. They comes in a variety of scents, but I prefer the non-scented ones. They can be purchased at Target, Babies R Us and Buy Buy Baby. However, I like to order them from Drugstore.com as they are Buy 3, Get 1 Free. Drugstore.com also has a reward dollar program AND you can use Ebates!

(3) NoseFrida - NoseFrida is an alternative to the traditional syringe bulb. I heard about the NoseFrida from Twitter and cannot say enough good things about it. I love sharing how well it works for us with fellow moms. I love it for 2 big reasons: (1) You control the level of suck. (2) You can see what comes out!

Not pictured is our Rock n Play. Jack has been sleeping in his crib since 6 or 7 weeks old. But when he got a cold, we let him sleep in the RnP to help with the drainage. I definitely think it helped!

Any other products I should know about? 


Sunday, November 11, 2012

Chocolate Peanut Butter Chip Cookies

 
Really, who is tired of my baking yet? Luckily, the people in my life are enjoying the fruits of this labor! For this week's link up with AP at I Love You More Than Carrots, I baked specifically with my father-in-law in mind. We had dinner with my in-laws on Saturday and I wanted to bring him something sweet. He has a big sweet tooth! 
Like his son, he is a fan of chocolate and peanut butter. I made these cookies back in September. I wanted to use the Reese's Peanut Butter Chips that I had in the pantry. After a bit of Pinterest browsing, I found the following:

Unlike past baking projects, I made several modifications to this recipe, including adjusted baking time, ingredient additions and changes. Here is my adaptation:

Chocolate Peanut Butter Cookies
Adapted from KA Flour
Yield 2.5 dozen cookies

1 1/2 cups flour
1/2 cup cocoa powder
1/2 teaspoon baking soda
1/4 teaspoon salt
1/2 cup granulated sugar
1/2 cup brown sugar
1/2 cup (8 tablespoons) unsalted butter, softened
1/4 cup smooth peanut butter
1 teaspoon vanilla extract
1 large egg
2 tablespoons water
1 tablespoon of brewed coffee, cooled
1 2/3 (1 bag) cups Reese's Peanut Butter Chips

Preheat the oven to 375°F.

In a medium-sized bowl, whisk together the flour, cocoa, baking soda, and salt.

In another bowl, beat together the sugars, butter, and peanut butter until light and fluffy. Beat in the vanilla, egg, coffee, and water, then stir in the dry ingredients, blending well. Stir in the peanut butter chips

Using a cookie scoop, scoop dough onto the prepared baking sheets.

Bake the cookies for 10 minutes, or until they're set and you can smell the chocolate. Remove them from the oven, and cool on a rack.


These cookies turned out so yummy. So pour yourself a glass of milk (or Lactaid in my case) and enjoy!


Wednesday, November 7, 2012

Rigatoni with Bacon, Beans and Veggies


I posted the above on Instagram and Twitter on Monday and received a handful of requests for the recipe. The thing is...there wasn't a written recipe! So I interviewed J and asked him how he made it.

Rigatoni with Bacon, Beans and Veggies
4 servings (2 for dinner/2 for lunch the next day)

Ingredients

1 box of rigatoni
6 strips of bacon
1 tsp olive oil
1 medium onion, diced
1 carrot, diced
1 celery stalk, diced
2 portabella mushroom caps, diced
1 tsp tomato paste
1 tsp anchovy pasts (optional)
3 cloves garlic, minced
4 cups greens (spinach or broccoli rabe- used a mix of both)
½ cup of water
1 can cannelini beans, drained and rinsed
grated parmesan cheese to taste
chopped Italian parsley (optional)
salt and pepper
    
  1. Start boiling water for pasta
  2. In a large saucepan (J used a 3 qt but could have used a little more room), fry bacon in the olive oil over medium low heat till fat is rendered and bacon starts to crisp. Reserve 2 tbsp of bacon drippings and toss the rest.
  3. Using the reserved bacon dripping, sauté the onion, carrot and celery till softened. Add a pinch of salt.
  4. Add the portabella mushrooms and another pinch of salt. Saute till softened.
  5. Add tomato paste, anchovy paste and garlic. Stir to combine.
  6. Add the greens and water plus a pinch of salt. Cover.
  7. Start cooking the pasta.
  8. After 5 minutes, remove the lid and add the cannelini beans. Add salt and pepper to taste.
  9. Once the pasta is cooked per box instructions, add to the pan plus 1 ladle of the pasta water.
  10. Liberally add parmesan cheese and parsley


Recipe Notes
  • There isn't a true sauce for this pasta. The pasta water plus the water from the green combined with the cheese will coat the pasta.
  • You can substitute button mushrooms (or any type of mushrooms) for the portabella.
  • You can substitute chicken sausage (taken out of the casings) for the bacon.
  • You'll notice J salts at each layer he adds to the dish. This is to help bring out the natural flavors of the ingredients. It was a tip we learned from all those cooking shows we watched when we still had cable!
Hope you enjoy this weeknight meal!


Tuesday, November 6, 2012

How I Fight a case of the wants

We all get a case of the "wants" from time to time. Like me, you may covet a handbag that someone blogged about or a shirt that is featured in the latest issue of "In Style". However, like me, you may not be able to instantly satisfy this want. I will try to rationalize with myself. Also, I don't need more stuff!

One way I've found to curb the "wanting" feeling is to reorganize what I have. I periodically weed out my accessories so not to be overwhelmed by the chaos. Sometimes it seems easier to just buy something new instead of figure out what you already have. I blogged about this back in 2010 and thought it was time to revisit.


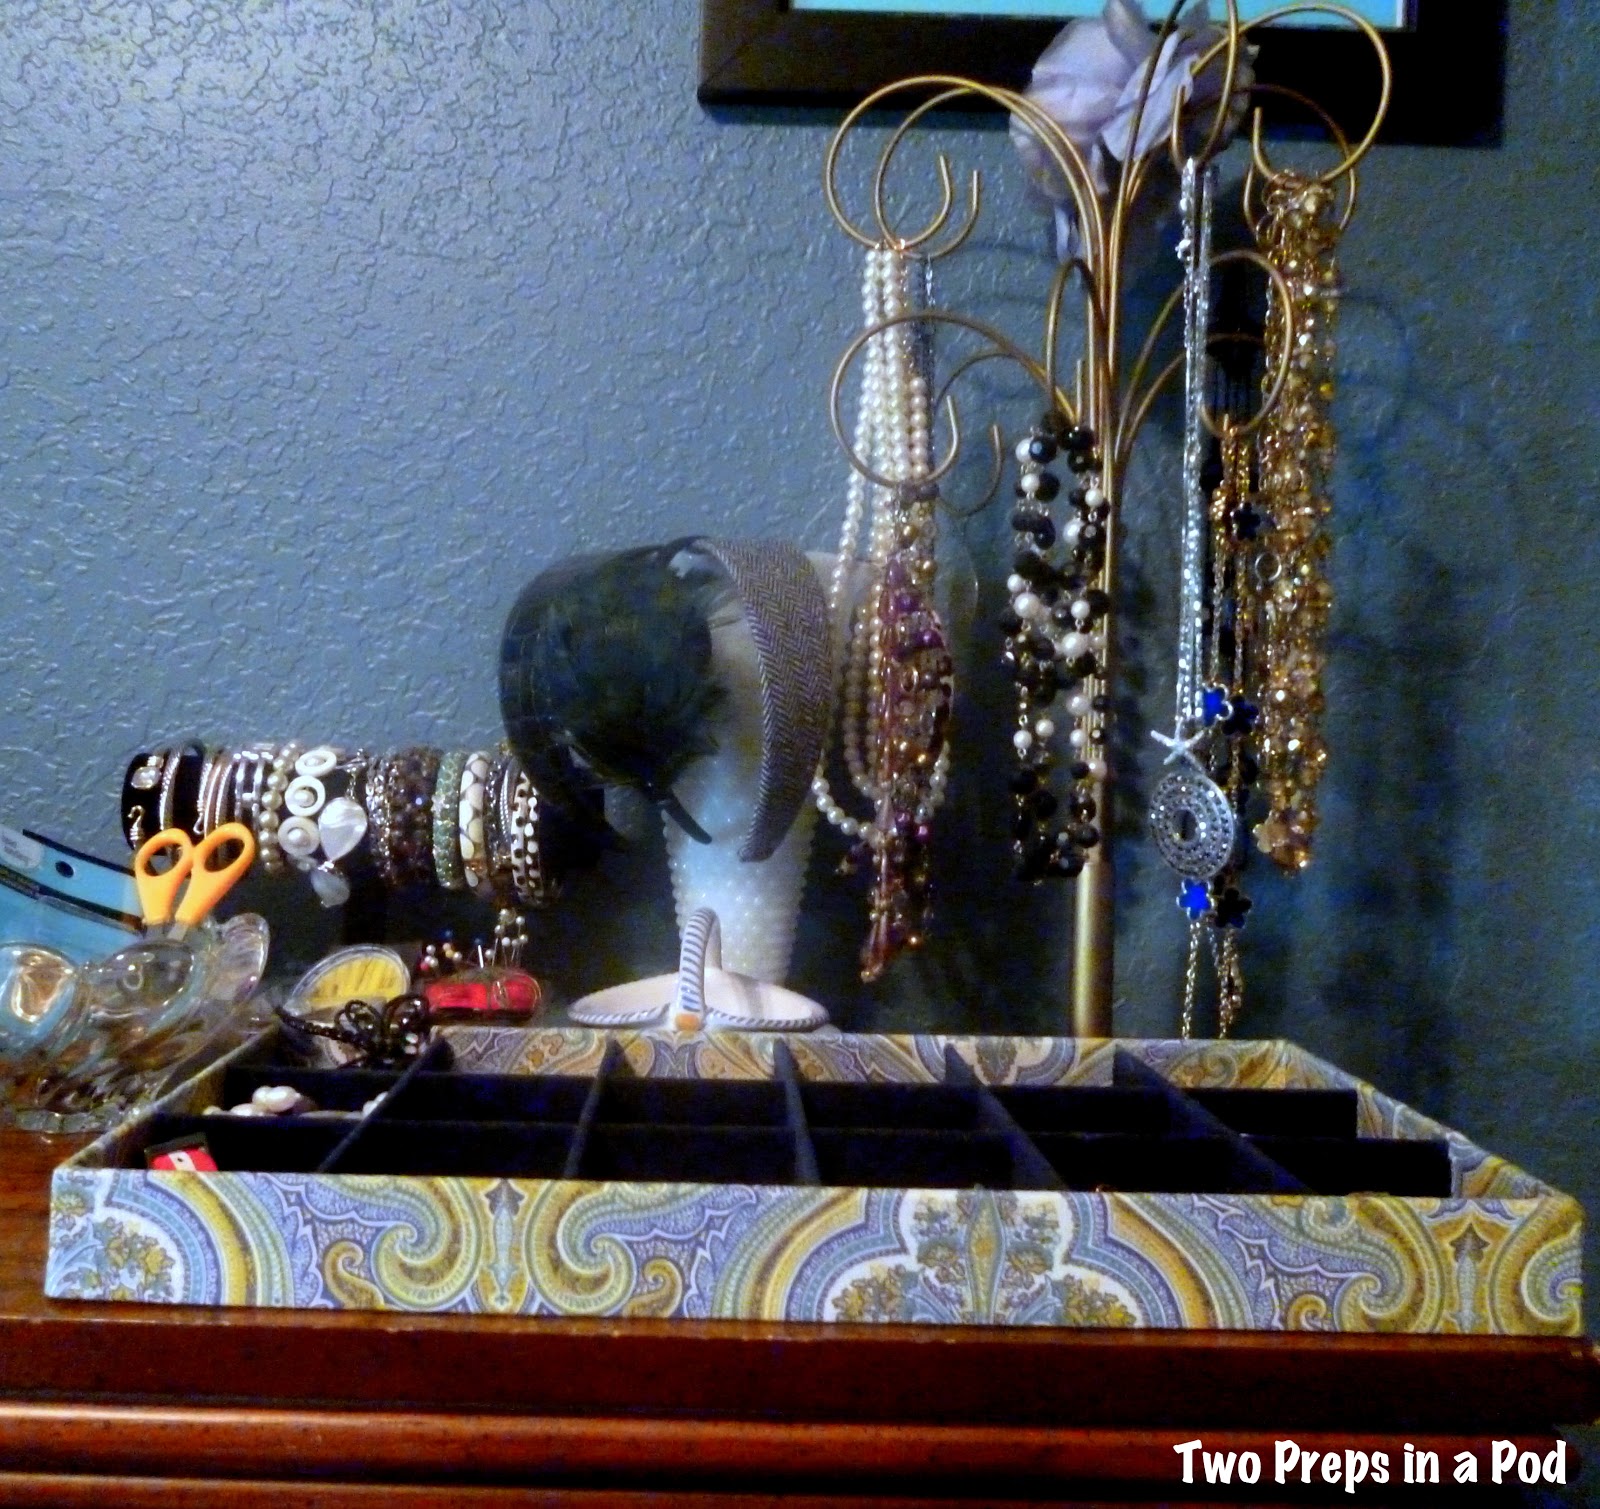
I recently purchased the bracelet display stand from Michael's. It was $7. I originally wanted an acrylic one but this one will do just fine! I used to think I did not own many bracelets until I put them on all this stand. Yeah, I own enough!

The display tray was purchased 2 years ago at TJ Maxx. They run anywhere from $6 to $8. However, I see them EVERY TIME I'm there so I'm sure you can too! I keep earrings and pins in the tray. I also keep a selection of necklace extenders. I have a FAT neck. Truly. So to keep a lot of necklaces from looking like Blossom esque chokers, I use the necklace extenders. I purchased a set of 6 (3 silver colored/3 gold colored) from eBay for around $5.

I also keep my sewing supplies nearby in case I notice any wardrobe malfunctions that need quick repair.

The necklace "tree" is actually an old ornament stand that I stole took from my parents' garage a few years ago. I always intended to spray is silver, but alas, two years later, I still haven't done it.

My headbands are hanging off a milkglass vase that I bought at a garage sale for 50 cents.

Hopefully, by keeping my jewelry in order, I'll resist the urge to buy more.

Funny story, I started this blog post on Monday afternoon. Then Monday night, I was looking at the Bellevue Newport flash sale. I saw a tortoiseshell necklace that  really wanted. So I bid but I was too late. Then I go back to finish this post and realized: Self, You did not need that necklace!!

So there's that. :)


Sunday, November 4, 2012

Hey, That's Pin-tastic!: Salted Toffee Chocolate Chunk Cookies

For this week's linkup with AP at I Love You More Than Carrots, I decided to bake for a good friend of mine who just had a baby. I know you are supposed to bring a casserole or something. But I firmly believe a woman with a new baby NEEDS chocolate more :)
I checked out her "Yums for the Tums" board on Pinterest and re-pinned one of her pins. Pinterest definitely made it easier to select a recipe that I already know will appeal to her! It reminded me of a Salted Caramel drink from Starbucks.

And really. It is salty and sweet. Who doesn't like that?


The original recipe calls for you to use chopped semi-sweet chocolate. I substituted dark chocolate chips. Here is my mise en place.


The original recipe also uses a muffin top tin to make giganitic yet uniform cookies. They indicate the yield as 16 cookies. However, I used a cookie scoop and got 4 dozen out of it.


The fleur de sel is what makes this cookie special. The salt and crunch set off the richness of the chocolate and Heath bar bits. If you like salty-sweet desserts, then you will enjoy this recipe!